This is the third chapter in the series – Scalable, Highly Available, Secure WordPress on Azure.
In here I am going to describe the network scaffolding that would be created for our platform to be reliable, secure and robust. The script described here creates VNET, subnets and NSGs.
Creation of V-Net, Sub-net and NSGs
I will create the network infrastructure required and configure security from the very start by plugging in the network security groups (NSGs) within the network subnets. The scripts to execute for this chapter is ‘2-create-network.ps1‘.
First we detect if our Virtual Network (VNET) is already created (Get-AzVirtualNetwork) and create it (New-AzVirtualNetwork) if its not created.
$VnetAddressPrefix = "10.0.0.0/16"
$frontendSubnetAddresPrefix = "10.0.1.0/24"
$backEndSubnetAdressPrefix = "10.0.2.0/24"

$virtualNetwork  = Get-AzVirtualNetwork -Name $VirtualNetworkName `
  -ResourceGroupName $RESOURCEGROUP_NAME -ErrorAction SilentlyContinue
if (-not $virtualNetwork)
{
    $virtualNetwork = New-AzVirtualNetwork `
                        -ResourceGroupName $RESOURCEGROUP_NAME `
                        -Location $LOCATION -Name $VirtualNetworkName `
                        -AddressPrefix $VnetAddressPrefix
}
Once the VNET is created, I create the two subnets inside it. The scripts invokes a function (createSubNet) to create the subnets.
createSubNet function checks if the Subnet mentioned already exists using the Azure Cmetlet – Get-AzVirtualNetworkSubnetConfig – and if it does not exists, creates it using the Azure Cmdlet – Add-AzVirtualNetworkSubnetConfig
if ($virtualNetwork)
{
    # create the subnets
    $frontEndSubnet = createSubNet -SubnetName $FrontEndSubnetName `
                -virtualNetwork $virtualNetwork `
                -AddresPrefix $frontendSubnetAddresPrefix
    $backendSubnet = createSubNet -SubnetName $BackendSubnetName `
                -virtualNetwork $virtualNetwork `
                -AddresPrefix $backEndSubnetAdressPrefix

        # both subnets exist now; save status ;
        $virtualNetwork | Set-AzVirtualNetwork
...
}
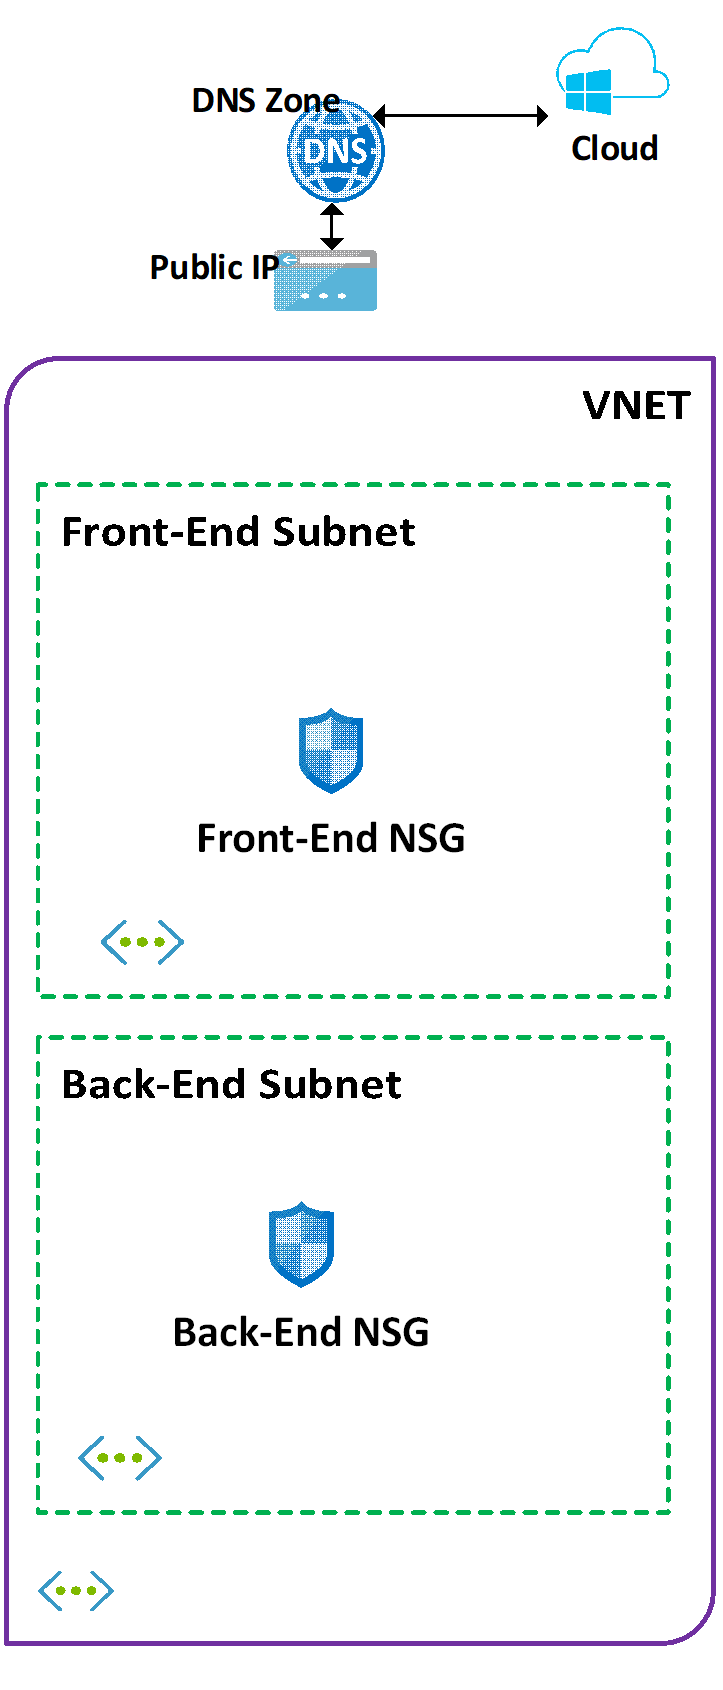
Once the Subnets have been created, I create couple of NSGs and attach both the created NSGs, one to the front-end Subnet and another to the back-end Subnet.
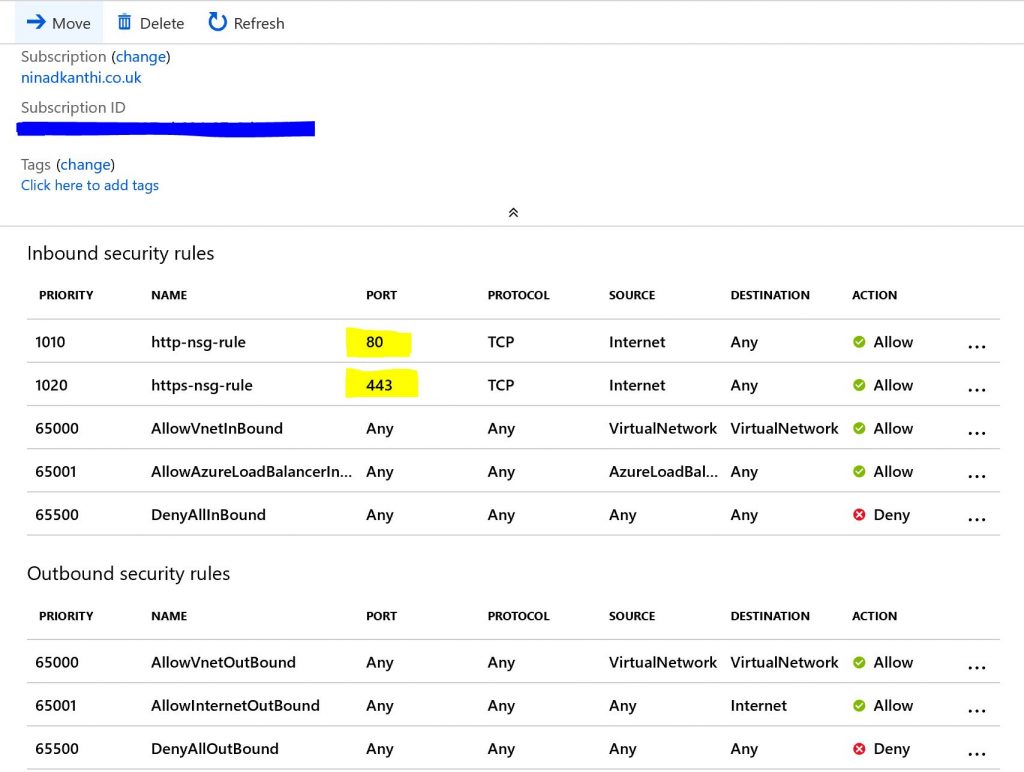
Important to emphasize that front-end NSGs defines rules which permit HTTP and HTTPS traffic from the internet and no other port, especially SSH, is open at the time of the creation. Backend Subnet is locked down from internet or external access
Inside the script, creation of NSGs is handled by the function –createNSG . This function check for the existence of the asked NSG (using the Azure Cmdlet Get-AzNetworkSecurityGroup) and if it does not exists, creates a new NSG using the Azure Cmdlet – New-AzNetworkSecurityGroup. The second parameter is set to $true whilst creating the front-end NSG. It triggers the creation of exception for HTTP, HTTPS settings. NSG rules are created using the Azure Cmdlet – New-AzNetworkSecurityRuleConfig
Finally both the created NSGs are added to the Subnets using the Cmdlet – Set-AzVirtualNetworkSubnetConfig
{
...
# lets update with NSGS
  $frontendNSG = createNSG -NsgName $FrontEndNSGName -addRules $true
  $backendNSG = createNSG -NsgName  $BackEndNSGName -addRules $false

  if ($frontendNSG)
  {
   Set-AzVirtualNetworkSubnetConfig -Name $FrontEndSubnetName `
   -VirtualNetwork $virtualNetwork -NetworkSecurityGroup $frontEndNSG `
               -AddressPrefix $frontendSubnetAddresPrefix
  }

  if ($backendNSG)
  {
   Set-AzVirtualNetworkSubnetConfig -Name $BackendSubnetName `
         -VirtualNetwork $virtualNetwork `
         -NetworkSecurityGroup $backendNSG `
         -AddressPrefix $backEndSubnetAdressPrefix
  }
    $virtualNetwork | Set-AzVirtualNetwork
}
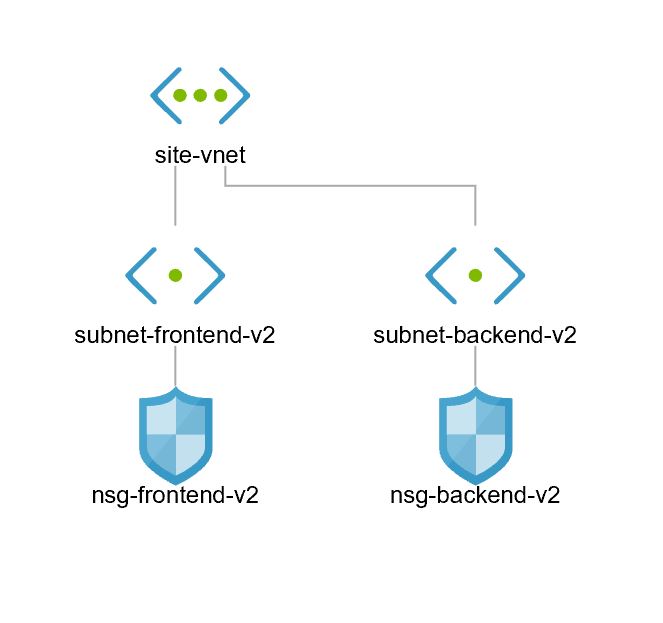
[Validation Tests]: Log on to the Azure portal and manually validate following components have been created
| Name | Type |
| nsg-backend-v2 | Network security group |
| nsg-frontend-v2 | Network security group |
| site-vnet | Virtual network |
| subnet-frontend-v2 | Subnets |
| subnet-backend-v2 | Subnets |
The Network security group ‘nsg-frontend-v2’ should be configured with following rules.

Important to emphasize that only two ports are open for internet. The network topology after the successful execution of the script ” should look like following:

After the execution of previous steps, we’ve created the following components and connections of our final target architecture.

