Time has come to create our servers. This is the next episode of our – Scalable, Highly Available, Secure WordPress on Azure series.
In this episode, I will be creating couple of web server and one database server. All the servers will be built on Linux OS -Ububtu v 16.04 from Canonical.
Important to emphasize that in the previous script execution, the NIC was created and plugged into the load balancer pools, NSGs and Subnet. The same NIC is now attached to the VM whilst the VM creation process. This action indirectly plugs the VM into our architecture at the right places.
Before we execute this script, one extra step, outside the script needs to be executed. This step is the creation of secure authentication keys using ‘ssh-keygen‘.
Creating Secure Authentication Keys
Open a bash shell/command line and use ssh-keygen to create an SSH key pair. Execute the following command
ssh-keygen -t rsa -b 2048It is recommended that you provide pass-key during the previous authentication key generation process. By default, the command copies your key to ‘C:\Users\<<username>>.ssh’ location. This location is used in the next step – process of Azure VM creation.
Creating Azure VMs
The script used to create the servers is located @ ‘5-create-VM.ps1‘. The corresponding script to clean all the resources created by this script is ‘5-remove-VM.ps1‘. The cleaning up script also has code to clean any managed disks that are created during the VM creation and they are left unattached after the VMs are removed.
Lets me quickly walk everyone through the script here. The function that creates the VM is called createVM. It accepts two parameter – name of the VM that is being created and the NIC name that should be attached to the created VM.
Within the script, first I detect if the VM already exist (Cmdlet – Get-AzVM) ; if it already exist there is nothing for the function needs to do.
Function createVM($nwInterfaceName, $VMName)
    # $nwInterfaceName : The interface name that the
    # created VM will be attached to
    # $VMName : Name of the VM that that is being created.
{
    $vm = Get-AzVM -Name $VMName `
        -ResourceGroupName $RESOURCEGROUP_NAME `
        -ErrorAction SilentlyContinue
    if (-not $vm)
    {
        … CREATE VM CODE HERE
    }
}
If the VM does not exist, rest of the function then creates a new VM using the parameters passed.
Initially, I create credentials object using the username – ‘webuser’ with blank password. With the design principal of being secure from ground-up, I’d only allow secure ssh login using authentication keys that I’d created in previous step. Password authentication and login will be disabled for my VMs.
        $securePassword = ConvertTo-SecureString ' ' `
            -AsPlainText -Force
        $cred = New-Object `
            System.Management.Automation.PSCredential ($WebUserName, `
                        $securePassword)
Next I obtain a reference to the network interface card created in the previous script -‘4-create-nw-interfaces-load-balancer.ps1‘ . Name of NIC is passed as one of the parameters of the function. We also obtain a reference to the availability zone that was created in our script – ‘3-create-availability-set-storage.ps1‘
        $nwInterface = Get-AzNetworkInterface `
            -Name $nwInterfaceName `
            -ResourceGroupName $RESOURCEGROUP_NAME


        $availabilitySet = Get-AzAvailabilitySet  `
            -ResourceGroupName $RESOURCEGROUP_NAME `
            -Name $AvailabilitySetName `
I now have the requisite information to create our VMs – lets get the ball rolling by creating the VM configuration object using Cmdlet – New-AzVMConfig and passing the requisite information for avaialiblity zones, OS details, OS image and NIC details. The attached NIC is specified as the primary NIC.
        $vmConfig = New-AzVMConfig -VMName $VMName `
            -VMSize Standard_B1s `
            -AvailabilitySetId $availabilitySet.Id  `
         | Set-AzVMOperatingSystem -Linux `
           -ComputerName $VMName `
           -Credential $cred `
           -DisablePasswordAuthentication `
         | Set-AzVMSourceImage -PublisherName Canonical `
           -Offer UbuntuServer `
           -Skus 16.04-LTS `
           -Version latest `
         | Add-AzVMNetworkInterface -Id $nwInterface.Id `
            -Primary
The last step remaining before the VM creation is to load the authentiation key into a variable, specify where the public key would be in the created VM and then invoke Cmdlet New-AzVM to create the VM. In this phase, I’ll create three NICs. Two NICs would be attached to the front-end Apache/WordPress web servers and one NIC would be connected with the back-end database servers.
        $sshPublicKey = cat ~/.ssh/id_rsa.pub
        $keypath=  "/home/" + $WebUserName + "/.ssh/authorized_keys"

        $dummy = Add-AzVMSshPublicKey -VM $vmconfig -KeyData $sshPublicKey -Path $keypath
        $dummy = New-AzVM -VM $vmConfig -ResourceGroupName $RESOURCEGROUP_NAME -Location $LOCATION
The function ”createVM’ is called three times in sequential fashion to create the three server VMs that are required in our architecture. The VMs are created on ‘Azure managed disks‘ as it provides better availability.
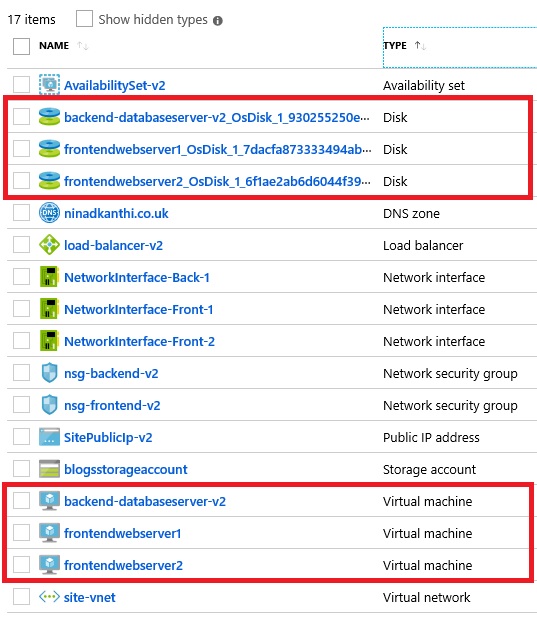
[Validation Tests]: Log on to the Azure portal and manually validate that following highlighted components have been created:

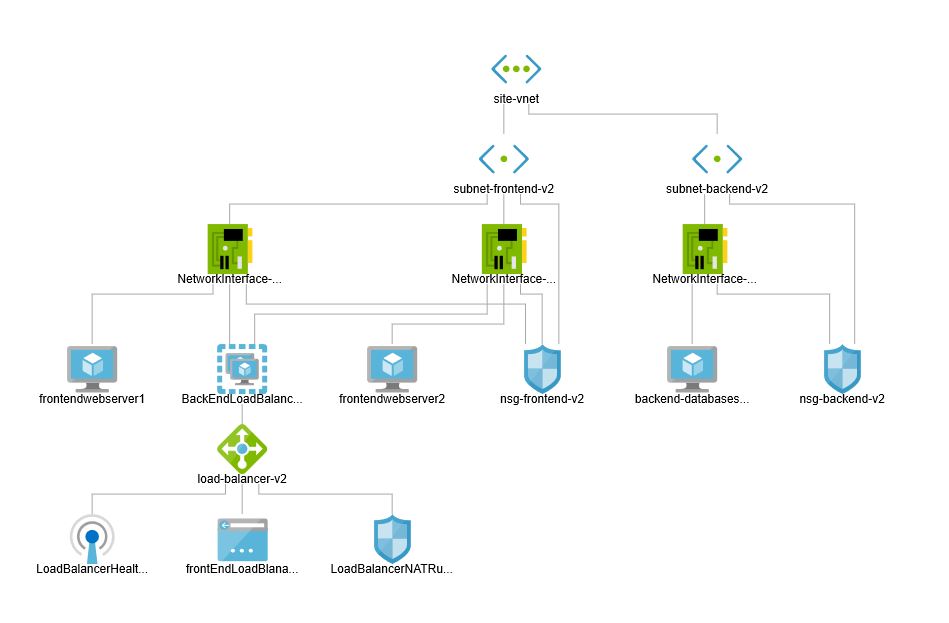
At this point, my target architecture is now complete. All the components are now plugged in.

I have our virtual network (site-vnet). It has two Subnets (subnet-frontend-v2, subnet-backend-v2). Two NSGs (nsg-frontend-v2, nsg-backend-v2) are plugged into the two subnets and are also connected to all the NICs that’ve been created. My two front-end web server are placed in the subnet-frontend-v2 and also into the BackEndLoadBalancer Pool of the load balancer. Database server is place in the subnet-backend-v2 and the attached NIC is connected with nsg-backend-v2, thereby restricting any external access. Load balancer front end pool is connected with the public IP address – SitePublicIp-v2
Now the only thing remaining to do is to install and configure the Apache, PHP, MySQL and WordPress software. This is what we’ll do next. but before we can get around to installing software, we have another issue that we need to resolve.
In our zealousness of being secure, there is no current way to ssh and remote login to our machines. That begs the question as to how we’d be installing and configuring the software on our machines. Next script will resolve that issue in a novel way.
Stay tuned.
