Next iteration in our series – Scalable, Highly Available, Secure WordPress on Azure.
In this task, I will be creating the requisite Azure load balancer and the virtual network interface card (NICs) .
The script used to create the components described here is located @ ‘4-create-nw-interfaces-load-balancer.ps1‘. The corresponding script to clean the resources created by this script is ‘4-remove-nw-interfaces-load-balancer.ps1‘
The creation script is a tad bigger than what we’ve faced so far so lets take it a little slow…
Creating Load Balancer
First we detect if the load balancer already exists under our resource group ( Cmdlet – Get-AzLoadBalancer) and if it doesn’t exist we create a new load balancer (Cmdlet – New-AzLoadBalancer). We specify the SKU to be ‘Standard‘ as that is required whilst creating VMs which are placed under managed storage and availability group.
$loadBalancer = Get-AzLoadBalancer `
    -ResourceGroupName $RESOURCEGROUP_NAME `
    -Name $LoadBalancerName `
    -ErrorAction SilentlyContinue

if (-not $loadBalancer)
{
….
    $loadBalancer = New-AzLoadBalancer `
        -Sku "Standard" `
        -ResourceGroupName $RESOURCEGROUP_NAME `
        -Name $LoadBalancerName `
        -Location $LOCATION
}
Next we create the services intrinsic to load balancer and for creating each components we first check if that component already exists, and if it does not, then create it using the requisite Azure Cmdlet.
By this time, you’d have realised the script pattern that I follow; Before creating any Azure service or component, I first check the existence of the service/component. If it does not exist, only then I create it
For the load balancer, following table summarizes the component that I create along with the Azure Cmdlet to check the existence of the component and the Cmdlet for creating the component. Once I’ve created the new component, I call Cmdlet – Set-AzLoadBalancer – to save the setting back into the load balancer.
| Component Name | Cmdlet to check if already exists | Cmdlet to create a new component |
| FrontEndIPConfig | Get-AzLoadBalancerFrontendIpConfig | Add-AzLoadBalancerFrontendIpConfig |
| BackendAddressPool | Get-AzLoadBalancerBackendAddressPoolConfig | Add-AzLoadBalancerBackendAddressPoolConfig |
| Probe | Get-AzLoadBalancerProbeConfig | Add-AzLoadBalancerProbeConfig |
| Rule | Get-AzLoadBalancerRuleConfig | Add-AzLoadBalancerRuleConfig |
| Inbound NAT Rule | Get-AzLoadBalancerInboundNatRuleConfig | Add-AzLoadBalancerInboundNatRuleConfig |
Notes on creating the load balancer
- The public IP address component created in the first script is connected with the FrontEnd IP Config. This way the connectivity with internet is established with the load balancer
- Backend pool is connected empty.
- In the second phase of this script, the front-end NICs will be created and connected back into this pool.
- In the next script, VMs will be created attached to the NICs created. In this fashion, the back-end pool is connected to web server VMs using the NICs
- Probe is using HTTPS protocol as this is the default secure implementation of our architecture. Default ping is set @ 20 seconds and 2 consecutive error status are deemed to indicate VM unavailable.
- One inbound NAT rule, for port 80 is specified for one of the back-end webserver VMs.
Creating NICs
In this phase, I’ll create three NICs. Two NICs would be attached to the front-end Apache/WordPress web servers and one NIC would be connected with the back-end database servers.
Whilst creating the NICs I ensure that they are positioned correctly within our network and also within our load balancer configuration.
- The function to create all the NICs is called – createNetworkInterface. This function first verifies the pre-existence of NIC (Get-AzNetworkInterface) and if the answer is negative, creates a new NIC using Cmdlet – New-AzNetworkInterface. Various parameters are specified whilst invoking the call to – New-AzNetworkInterface . This ensures that the NICs are plugged into correct architecture.
- All the NICs are created with proper Subnet ID and proper NSG specified. The two front-end NICs are provided with the objects of front-end Subnet and front-end NSGs. Similar back-end configuration is provided for the one back-end NIC. The parameters used for this purpose are ‘-SubnetId‘ and ‘-NetworkSecurityGroupId‘
- All NICs are created with property – EnableIPForwarding. In the later stages of this experiment, I’ll be connecting public IP addresses to these NICs. In order for public IPs to connect with the private IP addresses, it is important that this parameter is specified.
- The two front-end NICs are added to the back-end pool of the load balancer using the parameter – -LoadBalancerBackendAddressPoolId
- One front end NIC is added to the NAT rule using the parameter – LoadBalancerInboundNatRuleId
- The NICs that we are creating are flagged as ‘primary’ and finally we save all the configurations by invoking a call to – Set-AzNetworkInterface.
The complete code for the function is shown below.
Function createNetworkInterface($networkInterfaceName, # name of NIC
                $Subnet, # Subnet where the NIC will be plugged in
                $NsgGroup, # NSG where the created NIC will be placed nder
                $backEndPoolName = $null , # load balancer back-end pool,
                                           #if specified, NIC is added there
                $lb =$null, # name of load balancer, used to get the NST rule
                $natRule =$null) # name of the NAT rule
{
    $nwInterface = Get-AzNetworkInterface `
        -Name $networkInterfaceName `
        -ResourceGroupName $RESOURCEGROUP_NAME `
        -ErrorAction SilentlyContinue
    if (-not $nwInterface)
    {
        Write-Host  `
            -ForegroundColor Green  `
            "Creating Network Interface '$networkInterfaceName'"
        if ($backEndPoolName)
        {

            $tempPool = Get-AzLoadBalancerBackendAddressPoolConfig `
                -LoadBalancer $lb `
                -Name $backEndPoolName

            if ($natRule)
            {
                $nr = Get-AzLoadBalancerInboundNatRuleConfig `
                    -LoadBalancer $lb `
                    -Name $natRuleName1

                # create NIC with NAT Rule + Back-end Pool + Subnet + NSG
                $nwInterface = New-AzNetworkInterface `
                    -Name $networkInterfaceName `
                    -ResourceGroupName $RESOURCEGROUP_NAME `
                    -Location $LOCATION `
                    -SubnetId $Subnet.Id `
                    -NetworkSecurityGroupId $NsgGroup.Id `
                    -LoadBalancerBackendAddressPoolId $tempPool.Id `
                    -LoadBalancerInboundNatRuleId $nr.Id `
                    -EnableIPForwarding
            }
            else
            {
                # create NIC with Back-end Pool + Subnet + NSG
                $nwInterface = New-AzNetworkInterface `
                    -Name $networkInterfaceName `
                    -ResourceGroupName $RESOURCEGROUP_NAME `
                    -Location $LOCATION `
                    -SubnetId $Subnet.Id `
                    -NetworkSecurityGroupId $NsgGroup.Id `
                    -LoadBalancerBackendAddressPoolId $tempPool.Id `
                    -EnableIPForwarding
            }
        }
        else
        {
            # create NIC with Subnet + NSG
            $nwInterface = New-AzNetworkInterface `
                -Name $networkInterfaceName `
                -ResourceGroupName $RESOURCEGROUP_NAME `
                -Location $LOCATION `
                -SubnetId $Subnet.Id `
                -NetworkSecurityGroupId $NsgGroup.Id `
                -EnableIPForwarding
        }
    }
    $nwInterface.Primary = $true
    $dummy = Set-AzNetworkInterface -NetworkInterface $nwInterface
    return $nwInterface
}
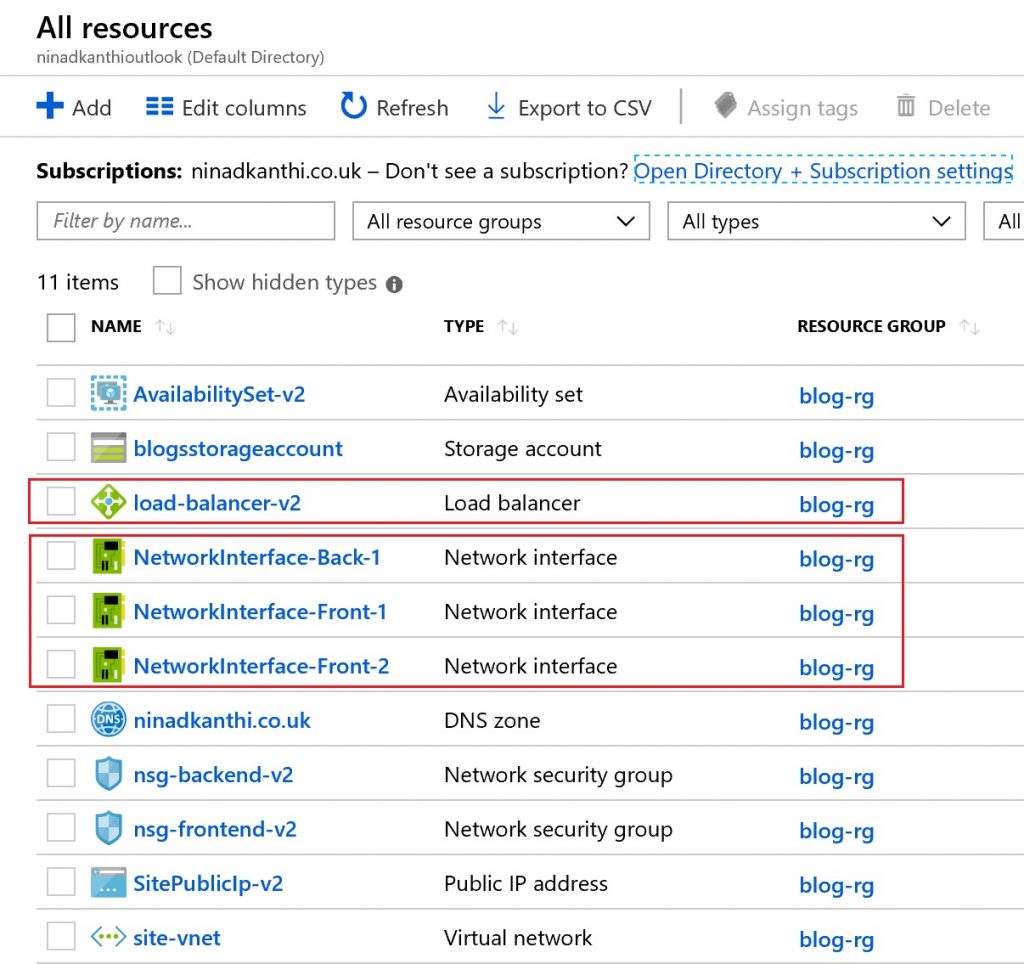
[Validation Tests]: Log on to the Azure portal and manually validate that following components have been created:

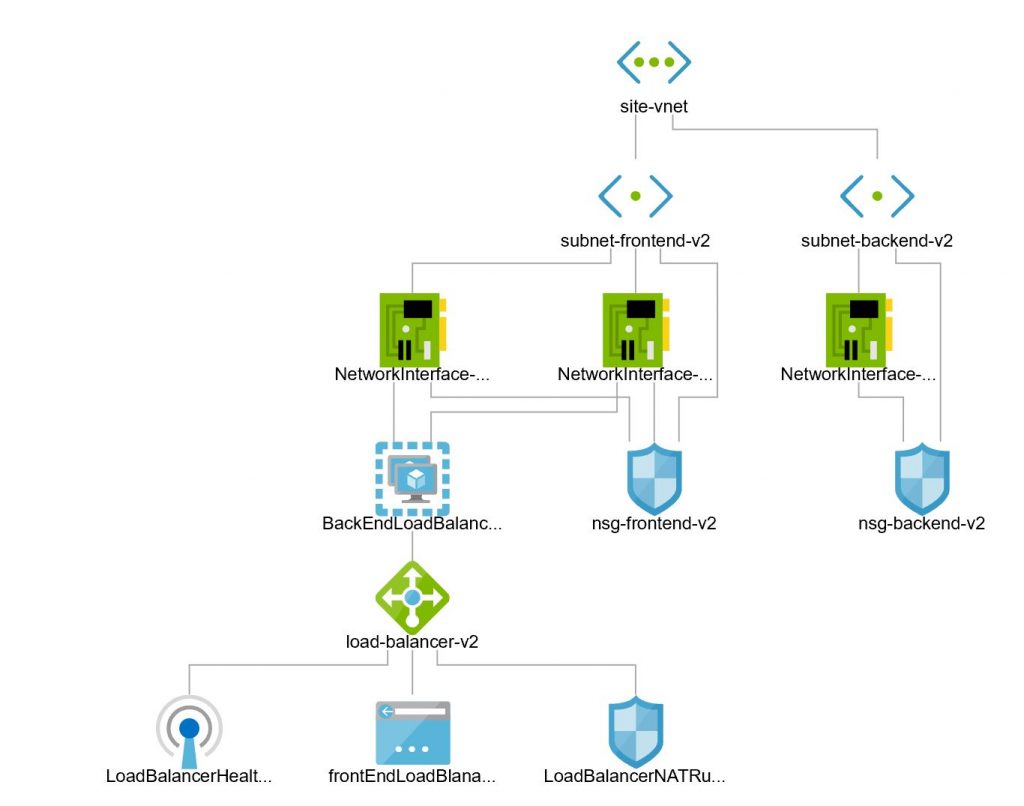
Our network topology is nearing completion and only missing components are the VMs which I’ll create in the next script. Our network at this point should look like following :

