Next iteration of our famous series -Scalable, Highly Available, Secure WordPress on Azure series.
Today we’d be resolving an issue that we’re facing in terms of our deployment so far.
In my zeal to employ best security principles from the ground-up, I’ve ended up in a situation where I am not able to remote-login into the servers created in the previous task. Which is no good as I need to access the servers to deploy the AMP + WordPress software stack on top of it. What are my options?
Secure Access Options
- Use a P2S Azure connection using Virtual Gateway
- Although elegant and secure solution, this option is cost-prohibitive. creating and managing a virtual gateway and having it running costs $. The advantage is that I don’t have to make any changes to network, NSGs and won’t have to open ports either.reate a P2S connection whilst creating a network gateway component inside my virtual network.
- Utilize the Just In Time access functionality provided by the Azure
- This option relies on changing the settings in the NSGs to open ports for certain duration for certain users. This option won’t work in our case as their are no public ports available to connect to the servers. The public IP connections would still need to be connected
- Create a Jump-Box server and deploy the functionality through it
- Yes, workable but would’ve involved creating and logging into a server which had security open – even if it a limited time window.
- Roll my own simple implementation
- The implementation that I have settled on was to create a script which will create temporary public IPs, attach them to the NICs which are linked with VMs and relax the NSG security restrictions. So in essence, you can think of rolling my own Just-In-Time security implementation but with the ability to open ports. The drawback, and its a big one in terms of security, is that the user has to manually remember to close the NSG ports and remove the public IPs created once the installation and configuration of servers is complete.
Implementation Details
The script used to create the servers is located @ ‘6-create-attach-temporary-publicIP.ps1‘. The corresponding script to clean all the resources created by this script is ‘6-detach-remove-temporaryIPaddress.ps1‘.
IMPORTANT: Although its wasn’t mandatory for the other clean-up scripts to be executed, it is an absolutely must for the clean-up script ‘
6-detach-remove-temporaryIPaddress.ps1‘ to be executed after the servers have been installed and configured with the requisite software
The script is again divided into two components. First is the process of creation of public IP addresses and attaching them to the previously created NIC and second is opening ports within our NSGs. Lets take it one by one.
Creating Public IP and Attaching it to NICs
The function implementing the functionality for creating public IPS and attaching them to an existing NICs is called – createAttach_PublicIP_NIC. It takes two parameters, first the name of the public IP address that needs to be plugged in and second the name of the NIC with which the public IP needs to be connected to.
As is the norm with all the scripts written so far, I first check the existence of the public IP address (Cmdlet – Get-AzPublicIpAddress) . If it does not exists, script creates an instance of it using the Azure Cmdlet – New-AzPublicIpAddress
Function createAttach_PublicIP_NIC($IpAddressName, `
                        $nicName
                        )
{
    #create a temporary public IP address
    $temporaryIP = Get-AzPublicIpAddress `
        -Name $IpAddressName `
        -ResourceGroupName $RESOURCEGROUP_NAME `
        -ErrorAction SilentlyContinue

    if (-not $temporaryIP)
    {
        Write-Host -ForegroundColor Green `
            "create a new static IP address '$IpAddressName'... "
        $temporaryIP = New-AzPublicIpAddress  `
                            -Name $IpAddressName `
                            -ResourceGroupName $RESOURCEGROUP_NAME `
                            -AllocationMethod Static `
                            -Location $LOCATION `
                            -Sku "Standard"
    }
Next script loads a reference to the NIC (Cmdlet – Get-AzNetworkInterface) with which the previously created public IP needs to be attached. If the reference exists, script attaches the public IP with the NIC using Cmdlets Set-AzNetworkInterfaceIpConfig and Set-AzNetworkInterface.
Interesting to note that all the existing connections for the NIC needs to be re-specified for the connections to be maintained whilst calling
Set-AzNetworkInterfaceIpConfig. The new parameter that is specified, that attached the public IP to the NIC is ‘-PublicIpAddress‘
Once the IP configuration values are specified, the setting are saved with a call to Cmdlet – Set-AzNetworkInterface
    $nic = Get-AzNetworkInterface `
            -Name $nicName `
            -ResourceGroupName $RESOURCEGROUP_NAME `
    if ($nic)
    {
        Write-Host -ForegroundColor Green `
            "Attaching the created public IP to NIC '$nicName'... "
        Set-AzNetworkInterfaceIpConfig `
            -Name $nic.IpConfigurations[0].Name `
            -NetworkInterface $nic `
            -Subnet $nic.IpConfigurations[0].Subnet `
            -PrivateIpAddress $nic.IpConfigurations[0].PrivateIpAddress `
            -LoadBalancerBackendAddressPool $nic.IpConfigurations[0].LoadBalancerBackendAddressPools `
            -LoadBalancerInboundNatRule $nic.IpConfigurations[0].LoadBalancerInboundNatRules `
            -Primary `
            -PublicIpAddress $temporaryIP
         Set-AzNetworkInterface -NetworkInterface $nic
    }
Opening SSH Ports within NSGs
Once the public IPs are coupled with the NICs, I’ve established connectivity but still the access to the VMs is not allowed because of NSG restrictions. In the last phase of this script, I’ll grant RDP access from outside for these machines. The function that implements this functionality is – openRDPPortForNSGs. For a given NSG, it tries to find if the NSG rule already exists by iterating through all the existing rules that exists within that NSG (Cmdlet – Get-AzNetworkSecurityGroup) and matching each rule name with the one that we are creating. The reason I had to iterate all the rules is because I could not find a single Cmdlett which will tell me if that rule exists within a NSG. If it does not find any, it creates that rule using the Cmdlet – Add-AzNetworkSecurityRuleConfig . Whilst opening the RDP port, I specify all access, but in practise you might want to restrict it. Finally I call the Cmdlet – Set-AzNetworkSecurityGroup to save the settings within the NSG.
Function openRDPPortForNSGs($NsgName)
{
    $NSG = Get-AzNetworkSecurityGroup `
        -ResourceGroupName $RESOURCEGROUP_NAME `
        -Name $NsgName
    if ($NSG)
    {
        Write-Host -ForegroundColor Green "creating new rule for '$NsgName' ... "
        $existingRules = $NSG.SecurityRules
        $ruleExist = $false
        ForEach ($existingrule in $existingRules) {
            Write-Host $existingrule.Name
            If ($existingrule.Name.StartsWith($rdpSecurityRuleName))
            {
               $ruleExist = $true
               break
            }
        }

        if (-not $ruleExist)
        {
            # Add rdpRule to the collection
            Add-AzNetworkSecurityRuleConfig `
                -Access Allow `
                -Direction Inbound `
                -Priority 1050 `
                -Name $rdpSecurityRuleName `
                -NetworkSecurityGroup $NSG `
                -Protocol Tcp `
                -SourcePortRange * `
                -DestinationPortRange 22 `
                -SourceAddressPrefix * `
                -DestinationAddressPrefix *
            Set-AzNetworkSecurityGroup -NetworkSecurityGroup $NSG
        }
...
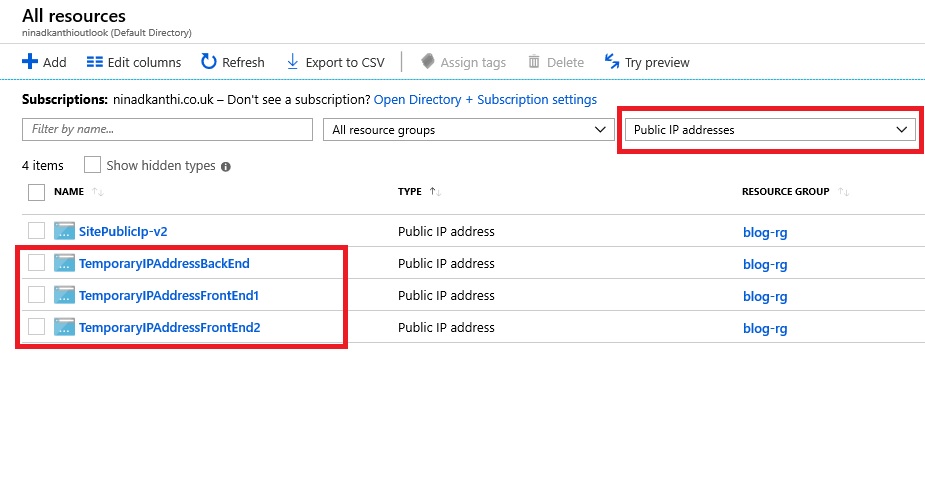
[Validation Tests]: Log on to the Azure portal and manually validate that following highlighted components have been created:

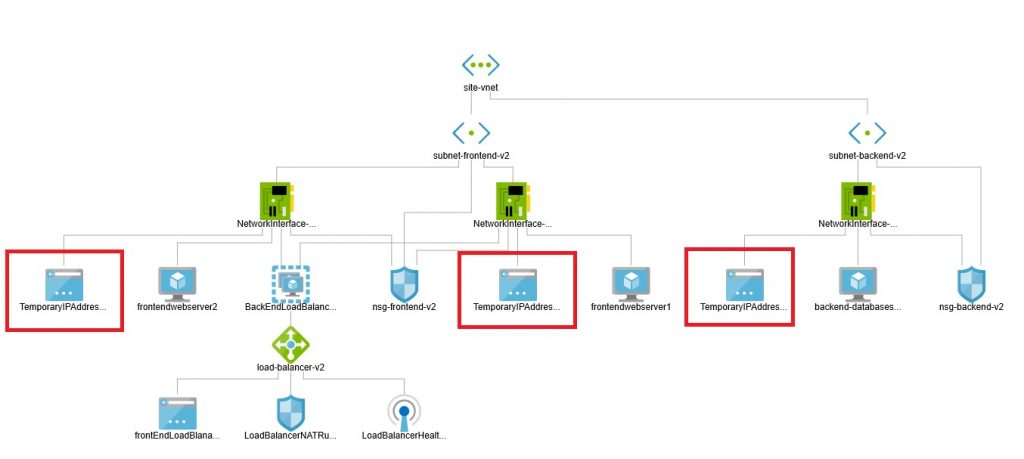
In terms of how the newly created public IP addresses are attached and plugged into our architecture is shown in the following diagram

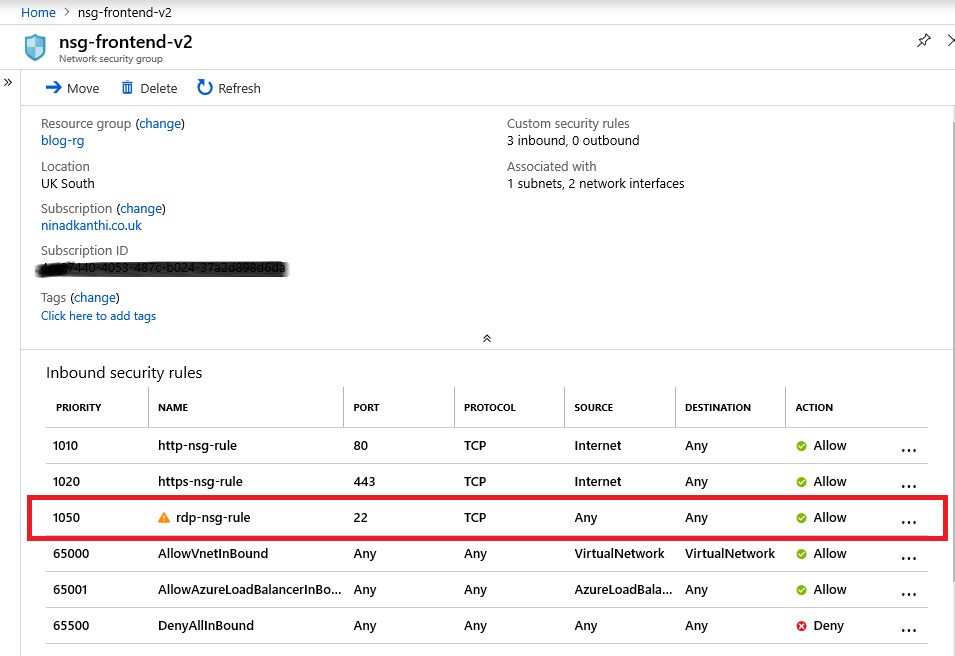
[Validation Tests]: Log on to the Azure portal and manually validate that following highlighted NSG ports have been opened up:

Next Steps
Now that I’ve opened the RDP ports to server from internet, it is imperative that I restrict the time-windows when our servers are exposed and can be compromised; thus I should install the software stack on the servers. ASAP. That is what I’ll do next.
And once I’ve complted the configuration of servers, I’ve to remember to close these ports and remove the public IP addresses I’ve created. It will not only make the solution more secure but also make it less costly – remember, each Public IP address created costs $’s.
