About
The blog explains how Azure Active Directory authentication for ASP.NET can be used to authenticate and authorize Python Web API using token validation techniques. The code repository is available here. This sample demonstrates how to manually validate the JWT access token in a Python Web API using custom code. Python validator (validateJWT.py) validates and confirms if the token is valid else returns 401, Unauthorized message.
References
This sample project builds from the Azure AD JWT validation sample available here and here. Reader is strongly advised to get familiar with the boiler plate code mention in the previous references.
Scope
The scope of this project is highlighted in the following image
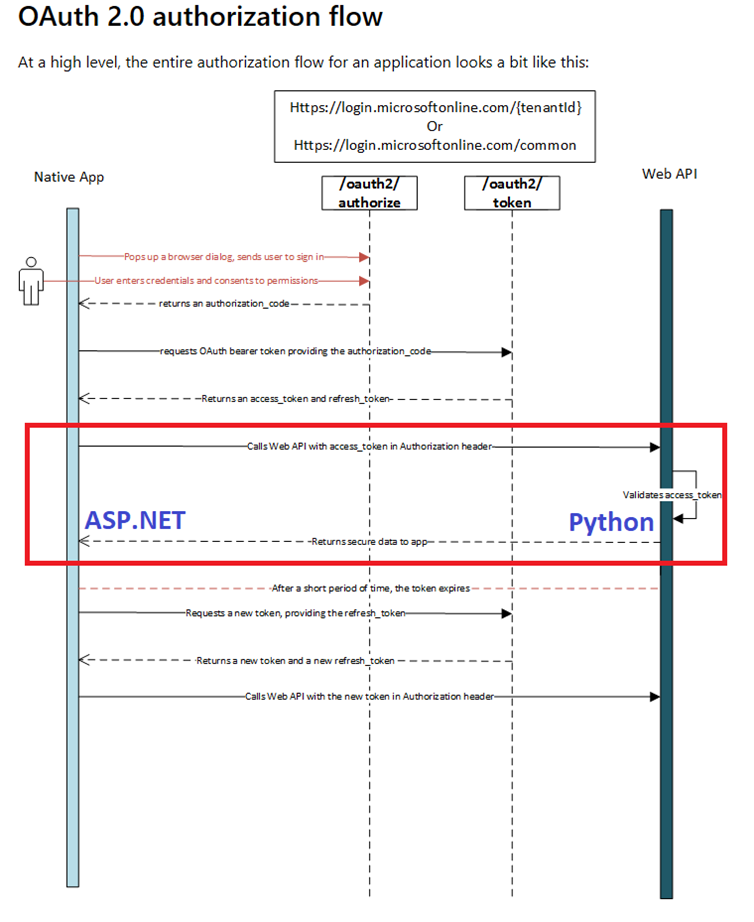
Scenario:
You would like to protect the access to your Web API and only authenticated users should be allowed to invoke the methods. The Python web API expects the authorization token to be added to the header of every web requests. On receiving the requests, it extracts the authorization token and using the open source tools and validates the claims, validating for audience, expiry, issuer claims.
How to run this sample.
To run this sample, you’ll need: Visual Studio 2017 – .NET Core 2.1 installed, internet connection, Azure account and python (v 3.5 onwards) installed.
Step 1: Clone or download this repository
From your shell or command line:
git clone https://github.com/ninadkan/SecureWebApp.git
Step 2: Register the sample with your Azure AD account
As a first step you’ll need to:
- Sign in to the Azure portal.
-
Click on All services in the left-hand nav and choose Azure Active Directory. Like so:
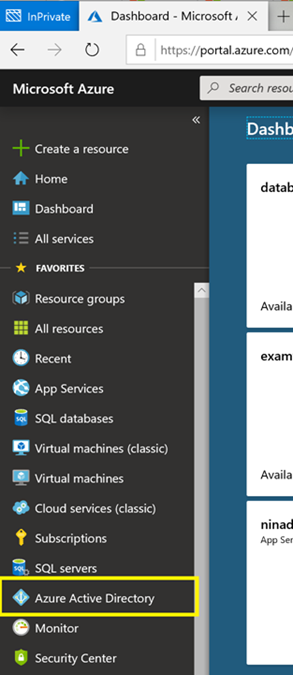
Register Python Web API
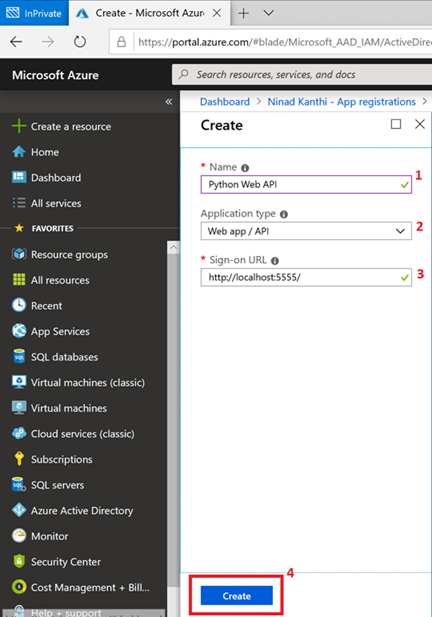
- In the Azure Active Directory pane, click on App registrations and choose +New application registration.
- Enter a friendly name for the application, for example ‘Python Web API‘ and select ‘Web app / API‘ as the Application Type.
- For the sign-on URL, enter the base URL for the sample, which is http://localhost:5555.
-
Click on Create to create the application.
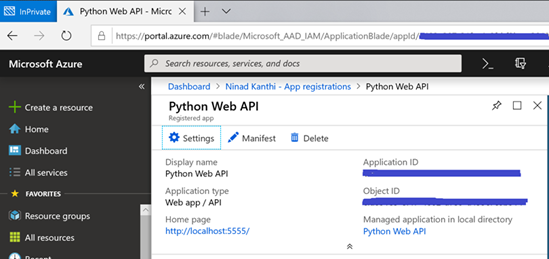
- Once the application is successfully registered, from the page displayed, make a note of the Application ID displayed. This value will be need as the value of key ‘WebAPIResourceId‘ in the ASP.NET Web project and as the value of key ‘ClientId‘ in your python web API project.
Register ASP.NET Web application
- Like previously, Click on App registrations and choose +New application registration.
- Enter a friendly name for the application, for example ‘ASP.NET Core Application‘ and select ‘Web app / API‘ as the Application Type. For the Sign-on URL, enter http://localhost:5000 .Click on Create to create the application.
- In the succeeding page, Find the Application ID value and copy it to the clipboard. This value will be used in the key ‘ClientId‘ of the ASP.NET web application configuration file
In the next three steps, we’ll create and make a note of an application key and grant permissions for this app to invoke python web API.
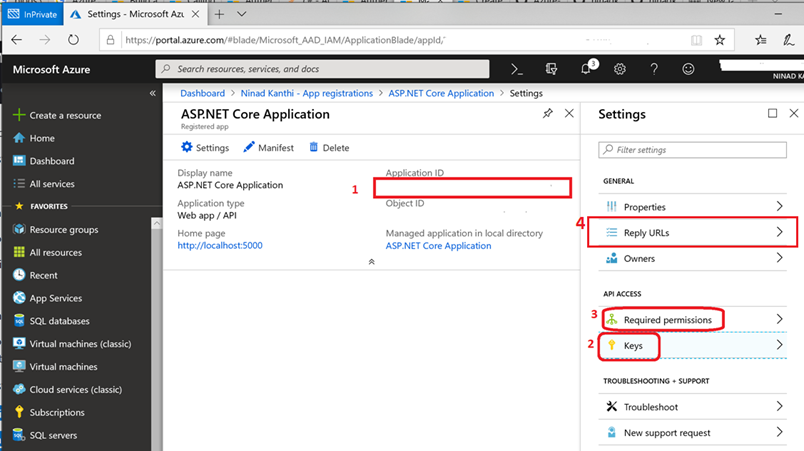
-
Next click on Settings and choose Keys.
- Type in any friendly value in the Description field. Select drop down of ‘In 1 Year‘ in the Expires column and click Save.
- IMP: Copy the value into clipboard. You won’t be able to retrieve this value after you close the blade.
- The value will be used in the key ‘ClientSecret‘ of the ASP.NET web application configuration file.
- Type in any friendly value in the Description field. Select drop down of ‘In 1 Year‘ in the Expires column and click Save.
- Next click on Settings and choose Required Permissions. click on Add, then Select an API, and type ‘Python Web API’ in the textbox and hit enter. Select ‘Python Web API ‘ from the results and click the ‘Select‘ button. Then, click on Select Permissions and select ‘Access Python Web API‘. Click the ‘Select‘ button again to close this screen. Click on Done to finish adding the permission.
- Next click on Settings and choose Reply URLs. Add two new records. First one specifies the reply URL for http (http://localhost:5000/signin-oidc) and the second one for https configuration (https://localhost:5001/signin-oidc). Click Save. Example shown below

Domain name and Directory ID
In this step we’ll make a note of the domain name and Directory ID of your subscription.
- To obtain the value of Directory ID, in your Azure portal, select ‘Azure Active Directory‘ à ‘Properties‘ à ‘Directory ID‘. Make a note of the value of ‘Directory ID‘. This value will be used in key ‘TenantId‘ of the ASP.NET web application and in the key ‘TenantId‘ of the Python Web API.
- To obtain the value of Domain name, select ‘Azure Active Directory‘ à ‘Custom domain names‘. Make a note of the value of first entry in under the column ‘Name‘. This value will be used in key ‘Domain‘ of the ASP.NET web application and in the key ‘DomainName‘ of the Python Web API.
Step 3: Edit project configuration files
Open the solution under Visual Studio 2017.
Changes to the ASP.NET application.
Select the ‘MVCSecureApp‘ and open the configuration file – appsettings.json – in the editor. The changes required to the file are mentioned below.
{
“AzureAd”: {
“Instance”: “https://login.microsoftonline.com/”,
“Domain”: “<< Add your domain name here >>”,
“TenantId”: “<< Add the previously noted Directory ID>> “,
“ClientId”: ” <<Add application id of the ASP.NET application here>>”,
“CallbackPath”: “/signin-oidc”,
“ClientSecret”: “<<Add the noted down key for the ASP.NET application>>”,
“WebAPIResourceId”: “<<Add Application ID for the Python Web API here>>”,
“WebAPIURL”: “http://localhost:5555/todo/api/v1.0/tasks”
},
“Logging”: {
“LogLevel”: {
“Default”: “Warning”
}
},
“PythonWebAPI”: {
“URL”: “http://localhost:5555/todo/api/v1.0/tasks”
},
“AllowedHosts”: “*”
}
Changes to the Python Web API project
- Select the Python web API (FlaskWebAPI) project inside the Visual Studio solution. Right click and select Add à New Item. In the New Item dialog box displayed, select ‘Empty Python File’ and change the name to ‘appSecrets.py‘.
- Add following lines to the recently added file
InstanceName = ‘https://login.microsoftonline.com/’
DomainName = ‘<< Add your domain name here >>
TenantId = ‘<< Add the previously noted Directory ID>>’
ClientId = ‘<<Add Application ID for the Python Web API here>>’
Step 4: Run the sample
Run the (F5) solution from Visual studio. To Test the application, the relevant UI is accessible from

Steps to recreate the project
<< Coming Soon>>
- Create a ASP.NET web application.
-
Add Python Web API to the solution.
- Test end-to-end connectivity
- Test end-to-end connectivity
- Register both of your application with your Active Directory tenants.
- Changes to ASP.NET application for token validation
- Add token validation to Python Web API
-
Add token access, adding it to the request header and making web API calls to ASP.NET application