New version of this deployment with better scalability, security, architecture is now available at V2. In future, this page will now be moved into maintenance mode
If you would like to start your own blog, are technically minded, don’t mind installing free software and also want the blog web-site to be professional looking without writing much code, then you’ve reached the right address on the net.
This article explains provides the step-by-step guide on creating a professional blog web site using LAMP stack with WordPress® on Azure.
Caveat: Although this document provides step-by-step guide as much as possible, reader is expected to have familiarity with Linux and Azure (Microsoft cloud offering). Most of the scripts needed for this setup are available from this GitHub repository: https://github.com/ninadkan/WordPressBlogOnLampAndAzure
Azure Subscription
First things first, you’ll need an Azure subscription. If you don’t have any, you can get a free subscription for 12 months by signing up. Navigate to https://signup.azure.com.
At the time of writing this blog, one could take advantage of £150 ($200) credit for 30 days. Whilst registering, you’ll need an email, a valid phone number and a credit card for authentication and verification.
[Manual Step]: Buy Azure subscription.
Non Free Tier
Your subscription will require the ability to configure purchased custom domain names. This feature is not available with the free subscription and you’ll need to remove the spending limits on your subscription. Removing the spending limits will allow your App service domains running under Azure to register the custom domain names. The instructions on how to achieve this manually is available here.
The same result can be achieved using the PowerShell script available from the GitHub repo here. ‘install.ps1’ script first creates a resource group, next creates an app service plan. Whilst creating the app service plan, ‘D1’ SKU is specified which moves the subscription out of the Free Tier layer. Finally, script creates a web app. This web app will be used to establish connectivity with the purchased custom domain name.
[Automation Step]: Execute the script ‘install.ps1‘ from the Windows PowerShell console.
[Validation Tests]: Log on to Azure portal – portal.azure.com and manually validate that the region, app plan and web app are created.
NOTE: Automation scripts are written in Azure PowerShell. All the global parameters are specified in ‘parameters.ps1‘ file. All scripts include common ‘login.ps1‘ script which validates that the user is logged in and ensures that the correct subscription is selected. If you want to clean the resources, use the script ‘uninstall.ps1‘.
Purchase Domain Name
To set-up a personalised blog, a URL, for e.g. ‘ninadkanthi.co.uk‘, needs to be registered. To achieve this, the domain name needs to be registered with ICANN-Registered Registrars. If you’ve already got the domain name, you can skip the rest of this section.
There are two options – either buy one from the other providers, like 123-reg.co.uk, goDaddy.com, bluehost.com; search for domain name registration in your web browser. Or you can buy one from the Azure portal itself. The detailed explanation of the former process is explained here and for the latter here
NOTE: If you are new to DNS, Zone, Records etc, recommend that you buy the domain name within Azure portal itself. if you pursue this path, i.e. buying the app service domain from the azure portal, the domain registration is provided by GoDaddy.com, LLC (“Go Daddy”), who would be registrar of record. Cost, at the time of writing this document was $11.99 per year.
NOTE: If you buy the domain name from the Azure portal, you have five days to cancel the transaction.
[Manual Step] For this exercise, I took the option of buying just the domain name – ‘ninadkanthi.co.uk‘ – for an year directly from the Godaddy.com website – cost was £1.20 (inclusive of tax for the first year!).
[Validation test]: You should now be able to login to your domain registrar web site and access your DNS records.
Bind a Host Name to the web app in Azure
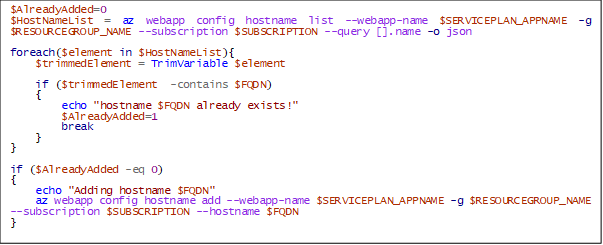
[Automation Step]: Execute the script ‘add-host-name.ps1‘ from the Windows PowerShell console. Validate that a successful result is returned.
Snippet of the script is shown below:
[Validation test]: Login to Azure portal (portal.azure.com). Open the Custom Hostnames blade (App Services à Select App Service à Custom Domains). Verify that the custom domain name is now mapped as a valid Custom Hostname.
[Validation test] You should now be able to navigate to your custom domain (ninadkanthi.co.uk) from your browser and see the default Azure ‘Your App Service app is up and running’ page being displayed by Azure.
Installing and configuring the Linux server
As mentioned earlier, we’ll host the WordPress site on the LAMP stack. This section covers creation and configuration of the Linux instance of the LAMP stack.
For the Linux variant, I’ve decided to use Ubuntu 16.04-LTS version with local SSD storage. The virtual machine size was chosen to be ‘B2’ as I believe it provides the best balance between cost and performance.
To install the Linux server, ARM template scripts were used and are copied here
[Automation Step]: To install the Linux server, first edit the ‘parameters.json‘ file with your settings, especially need to add the ‘adminPublicKey‘; by default, only SSH login is permitted to the instance.
Next execute the ‘deploy.ps1‘ script; will need to specify the subscription name, resource name and deployment name
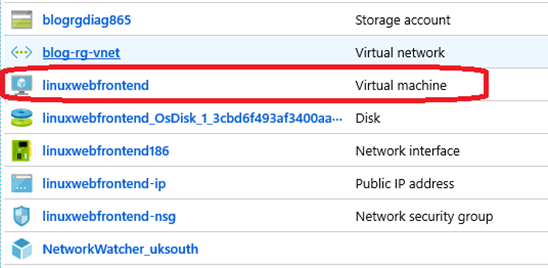
[Validation test]: Logon to the azure portal and confirm that the Linux compute had been provisioned under the chosen resource group. Besides the virtual machine, following other components and services should also be added under the resource group.
Adding Non-Root user to the Linux server
Login to the Linux web server (using Putty or any other Telnet terminal application). Before installing Apache and other software stack, we’ll add another user to the Linux machine and run everything under this user. This reduces the attack surface impact in terms of security compromise.
[Manual Step] Copy the script ‘addconfigureuser.sh‘ to the Linux server (using pscp or equivalent program, or download directly from the GitHub repository onto the Linux machine). Ensure that the script is marked as an executable (execute command ‘chmod + x addconfigureuser.sh‘)
Script creates a user named ‘webuser‘. During its execution, the script will ask for a password for the ‘webuser’. Ensure that you specify a strong password and make a note of that password.

[Validation test]: From the terminal window, execute command id -u webuser. If it returns a +ve number, it indicates that the user creation was successful.
[Validation test]: After successful execution of script, you should now be logged in as the newly created user – webuser.
Install and configure Apache
[Ensure that you’re logged in as ‘webuser’ on the Linux machine; if not execute command su – webuser from the terminal prompt]
[Manual Step] Copy scripts under the ‘webuser‘ of the GitHub repository to the Linux server (using pscp, direct from GitHub, or any other equivalent technique). Mark each script as an executable (hint use chmod +x …)
[Automation Step]: First check that the user has the permissions to install software. Execute the following commands.

[Validation test]: Successful execution of the script not only proves that the ‘webuser‘ has the requisite permissions to install downloads but also updates the system with the latest releases.
[Manual Step]: Execute the following commands which will install Apache server.

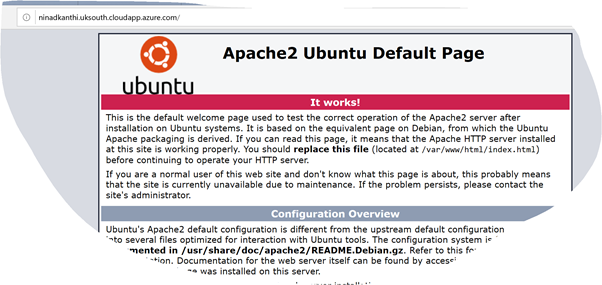
[Validation test]: Open browser and navigate to the public IP address of the Linux server. i.e. http://<IP_ADDRESS>. you should see the default Apache 2 Ubuntu default page like so
Static IP Address, DNS Name Label
Up until now we’ve provisioned connectivity for our custom domain name, i.e. ninadkanthi.co.uk from the external internet. Now we would like to establish the connectivity for the subdomain blogs.ninadk.co.uk with our Linux server. Two steps need to be done on the Azure side.
- Provision static IP for the Linux server (along with DNS name label).
- [Automation Step]: Execute the script ‘update-public-IP-DNS-labelname.ps1‘ from the Windows PowerShell console. Script check if the Linux instance is running and if it is it stops it. Next it configures the Linux instance to have a static IP address as well as specifying a domain name label.
- [Validation test]: Validate that a successful result is returned. Open browser and navigate to the domain name label (http://ninadkanthi.uksouth.cloudapp.azure.com) specified in the previous script. It should display ‘Your App service is running’ message from Azure.
Install and Configure Azure DNS
This step will resolve the subdomain name to map to the IP address of the Linux server. It will provide the last mile connectivity.
- [Automation Step]: Execute the script ‘create-DNS-zone.ps1‘ from the Windows PowerShell console. Validate that successful result was returned. Script creates a DNS zone under the Azure resource group.
- [Manual Step]: Login into the Azure portal and ensure that the DNS zone has been created. Select the DNS zone and manually add a DNS resource record (+ Record Set) as shown below.
- NOTE: in the following step, ‘blogs‘ is the subdomain specified, and the Azure resource is the public IP address of the Linux instance.
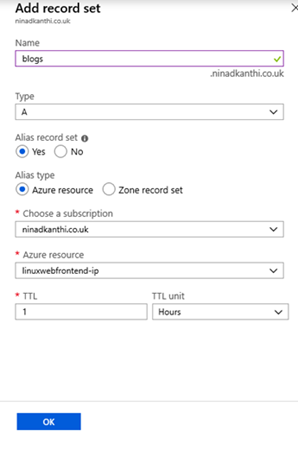
- Whilst on the Azure portal, open the DNS Zone that was created. Make a note of the name servers – like so
-
Login to your domain registrar web site and change the default NS records specified there with the four records captured in the previous steps.
- In the GoDaddy.com site, the end-result should be as following:
- [Validation Tests]: After ~ 1 hour, the changes should be reflected globally. Open the browser and navigate to your fully qualified domain name (FQDN) – blogs.ninadkanthi.co.uk It should display the default Apache Ubuntu page!
Install and configure MySQL Database
Login to the Linux server (as webuser) and execute following commands at the terminal prompt

Install and configure phpMyAdmin
Script Note:
First command installs the mysql-server. During the installation of mysql, you’ll be asked to enter password for ‘root’ user. Enter a strong password.
The second command – mysql_secure_installation – ensure that the database is configured with best practices for security.
Third and fourth commands are to start the database server and to enable it to automatically start upon boot.
Install and configure PHP
Login to the Linux server (as webuser) and execute following commands at the terminal prompt
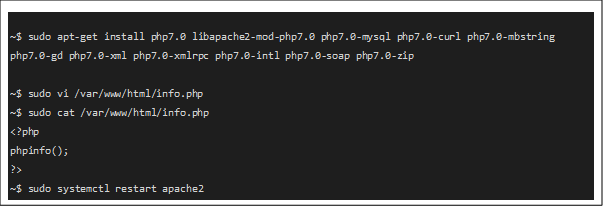
Command Note:
- First command installs PHP and its dependency modules.
- To test successful deployment of PHP, we’ll now copy a file called info.pho into the Apache web server root directory (/var/www/html/). The content of the file is <?php> phpinfo(); ?>
- Second command show how to use the ‘vi’ editor and location where the file is created.
- Third command shows the content output of file.
- Fourth command re-starts the apache2 server
[Validation Tests]: Open the browser and navigate to your domain name label/info.php (http://ninadkanthi.uksouth.cloudapp.azure.com/info.php). It should now display the PHP configuration page instead of the default Apache Ubuntu page! Example is shown below.
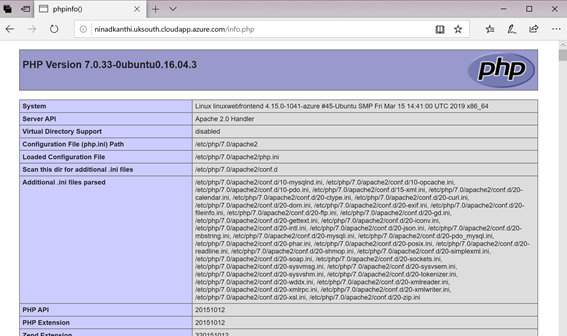
Finally remove the file as otherwise it will provide too much information to the user about your systems to outside user. Execute following command
~$ sudo rm /var/www/html/info.php
Install and configure WordPress
Login to the Linux server (as webuser) and execute following commands at the terminal prompt
Command Note:
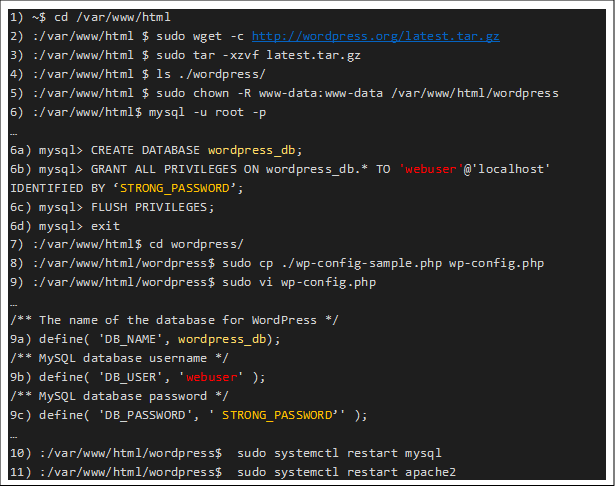
- Move to the default web server document root directory (/var/www/html). This is where we’d copy the download and install WordPress
- Download latest version of WordPress in zipped format
- Decompress and extract the content of the downloaded tar file
- Manually confirm and check that output is non-empty.
- Need to set correct permissions of this directory so the Apache server can access these files
- Create and configure mysql database that will be used by WordPress. Make note of the name of the database ‘wordpress_db’, user name ‘webuser’ and password ‘STRONG_PASSWORD’. Substitute ‘STRONG_PASSWORD’ with a strong password.
- Make WordPress web base folder as current directory
- Make a copy of the sample web configuration file added during the installation and rename it to be the default configuration file of WordPress
- Open the web configuration file and substitute the database name, username and password noted previously. Save and close the file
- Restart mysql
- Restart Apache2
[Validation Tests]: To test the installation, launch browser app, open the default url with ‘wordpress’ appended at the end. For the first time launch, it’ll ask you to create a wed admin username and password. Once logged in, it’ll redirect to its admin web page – http://blogs.ninadkanthi.co.uk/wordpress/wp-login.php. You can now make changes to the WordPress website using the administrator portal.
Congratulations, you’ve successfully installed WordPress and its also connected to the whole internet!
Replacing default apache2 and WordPress web pages.
At this point, if we navigate to ‘http://blogs.ninadkanthi.co.uk/wordpress’ we are taken to the WordPress web site default page. But if we navigate to any of the following URLs – http://<IPaddress-of-Linux-machine> or http://ninadkanthi.uksouth.cloudapp.azure.com/ or http://blogs.ninadkanthi.co.uk/ – they all show the default Apache 2 welcome page.
In this section, we’ll configure WordPress and Apache2 such that both display the WordPress blogs home page when navigating to above URLs.
WordPress configurations changes
Login to the WordPress admin portal – http://blogs.ninadkanthi.co.uk/wp-login.php –> http://ninadkanthi.uksouth.cloudapp.azure.com/wordpress/wp-admin/options-general.php
Change the two entries from original to new fully qualified web site address: The new values should look as following.
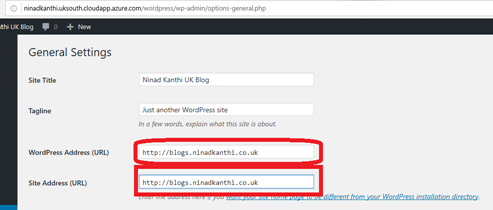
Click Save Changes.
Apache2 configuration changes
To configure Apache2, execute following commands at the terminal prompt.
Pre-step: Copy script ‘replace_str.sh‘ & ‘py_file_sub_str.py‘ onto the Linux machine and move the scripts to the folder /etc/apache2/ & /etc/apache2/sites-available/ respectively.
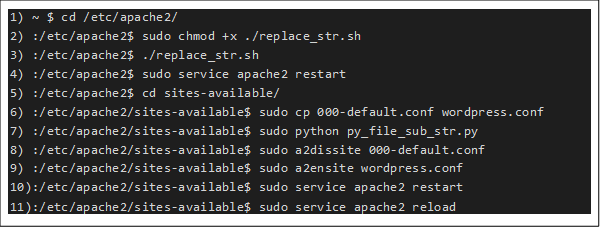
Commmand Notes:
- Set current working directory to apache2 installation folder
- Mark the previously copied script ‘replace_str.sh’ as executable
- Execute the script. It changes the default web site location from ‘/var/html/’ to ‘/var/www/html/wordpress’
- Restart the Apache service. Note that no error is displayed
- Change the current working directory to /etc/apache2/sites-available
- Make a copy of default web configuration file
- Execute script ‘py_file_sub_str.py‘ using python. Substitute relevant code from original to indicate wordpress web site as default. See ‘py_file_sub_str.py‘ script for the couple of substitutions that it does.
- Remove default configuration as the enabled web site configuration
- Make the newly created wordpress.conf as the enabled web site configuration
- Restart Apache2
- Reload Apache2
[Validation Tests]: Opening the URL – http://blogs.ninadkanthi.co.uk/ or http://ninadkanthi.uksouth.cloudapp.azure.com/ should now display the first page of the blog web site. Directly accessing the IP address should now give a 404 error(Web site not found error!)
Configuring SSH
Any end user opening and viewing our blogs web site is shown ‘not secure’ warning. Like so:

This section we’d install certificates to ensure that this Not secure warnings goes away.
Installing Certificates
To install SSH certificates, execute following commands at the terminal prompt
Pre-step: Copy the script ‘installcertificates.sh‘ onto the Linux machine. Update the script with the custom domain name in the line

Command Notes:
- Mark the script as executable
- Execute the script. Script used www.letsencrypt to install certificates. Ensure that you’ve specified the correct domain name to the script and that command can access and install files to the machine.
[Validation Tests]: After the successful execution of the script, README file is displayed from the installation folder.
Apache2 SSH configuration
Pre-step: Copy the script ‘py_file_replace_str.py‘ and ‘configure-ssl.sh‘ files onto the Linux machine. Copy both the files to folder /etc/apache2/sites-available. Edit configure-ssl.sh script to reflect your custom domain name and SSH keys.
Execute the following commands
1):~$ cd /etc/apache2/sites-available
2):/etc/apache2/sites-available$ sudo chmod +x ./configure-ssl.sh
3) :/etc/apache2/sites-available$ sudo cp default-ssl.conf wordpress-ssl.conf
4) :/etc/apache2/sites-available$ ./configure-ssl.sh
5) :/etc/apache2/sites-available$ sudo apachectl configtest
6) :/etc/apache2/sites-available$ sudo a2enmod ssl
7) :/etc/apache2/sites-available$ sudo a2ensite wordpress-ssl.conf
8) :/etc/apache2/sites-available$ sudo service apache2 restart
Command Notes:
- Change the current working directory to /etc/apache2/sites-available
- Mark the script as executable
- Copy the default ssl configuration into a new file called wordpress-ssl.conf
- Execute the script. It replaces the SSH key information and custom domain names.
- Test that the configuration added is correct
- Enable SSL for the apache web site
- Enable the SSL for the web site and specify the configuration file as the one that was newly created – wordpress-ssl.conf.
- Restart Apache2 web site for the changes and SSL to be available.
[Validation Tests]: After this step, you should be able to your web site with not only http prefix but also https prefix
WordPress SSH configuration
Login to the web administrator portal (http://blogs.ninadkanthi.co.uk/wp-admin/options-general.php). Change the default configuration to use HTTPS
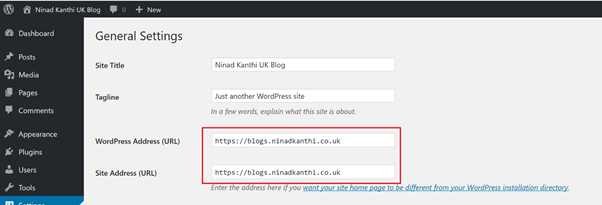
Click Save changes when done
HTTPS Redirect.
When the user logs in using http, we need to re-direct them to use the HTTPS instead of HTTP.
Add the following highlighted line to file /etc/apache2/sites-available/wordpress.conf
…
Include conf-available/serve-cgi-bin.conf
Redirect / https://blogs.ninadkanthi.co.uk/
</VirtualHost>
After this restart and reload apache2 like you’ve done before. Everything now will be running in https.
At this point, your blogs web site is up and running and accepting HTTPS traffic!
